How to Run nf-core Analysis on the Cloud Using nf-core/rnaseq Pipeline

nf-core is a great community-driven effort which makes bioinformatics pipelines very standardised and incredibly simple to run (Ewels et al., 2019) (check out our previous blog post which delves into what nf-core really is about). You can run these pipelines with ease, and rest assured that you are following community best practices.
However, for any given project, you still have to make sure you have installed all the required software (Nextflow & Docker/Singularity), manage all of your data, provide the necessary compute resources & wait long queue times if submitting to a computing cluster…

What if you don’t have the resources or are tired of waiting? In this blog post, we will show you how it is possible to run nf-core RNA-seq in the cloud, which provides a powerful solution for bioinformatics analysis. We have used the RNA-seq pipeline as an example because it is the most popular of all the nf-core pipelines. This method allows you to run nf-core RNA-seq in the cloud efficiently and effectively. The following can also be done for any of the nf-core pipelines, enabling you to run nf-core RNA-seq in the cloud with minimal effort.
The RNA-seq workflow processes raw FastQ inputs, aligns the reads and generates gene counts before performing extensive quality control on the results. (See the output documentation for more details).
How to import a pipeline
How to Run nf-core RNA-seq in the Cloud
Before starting, make sure you have already created your free CloudOS account. You can then navigate to the pipelines page on CloudOS:

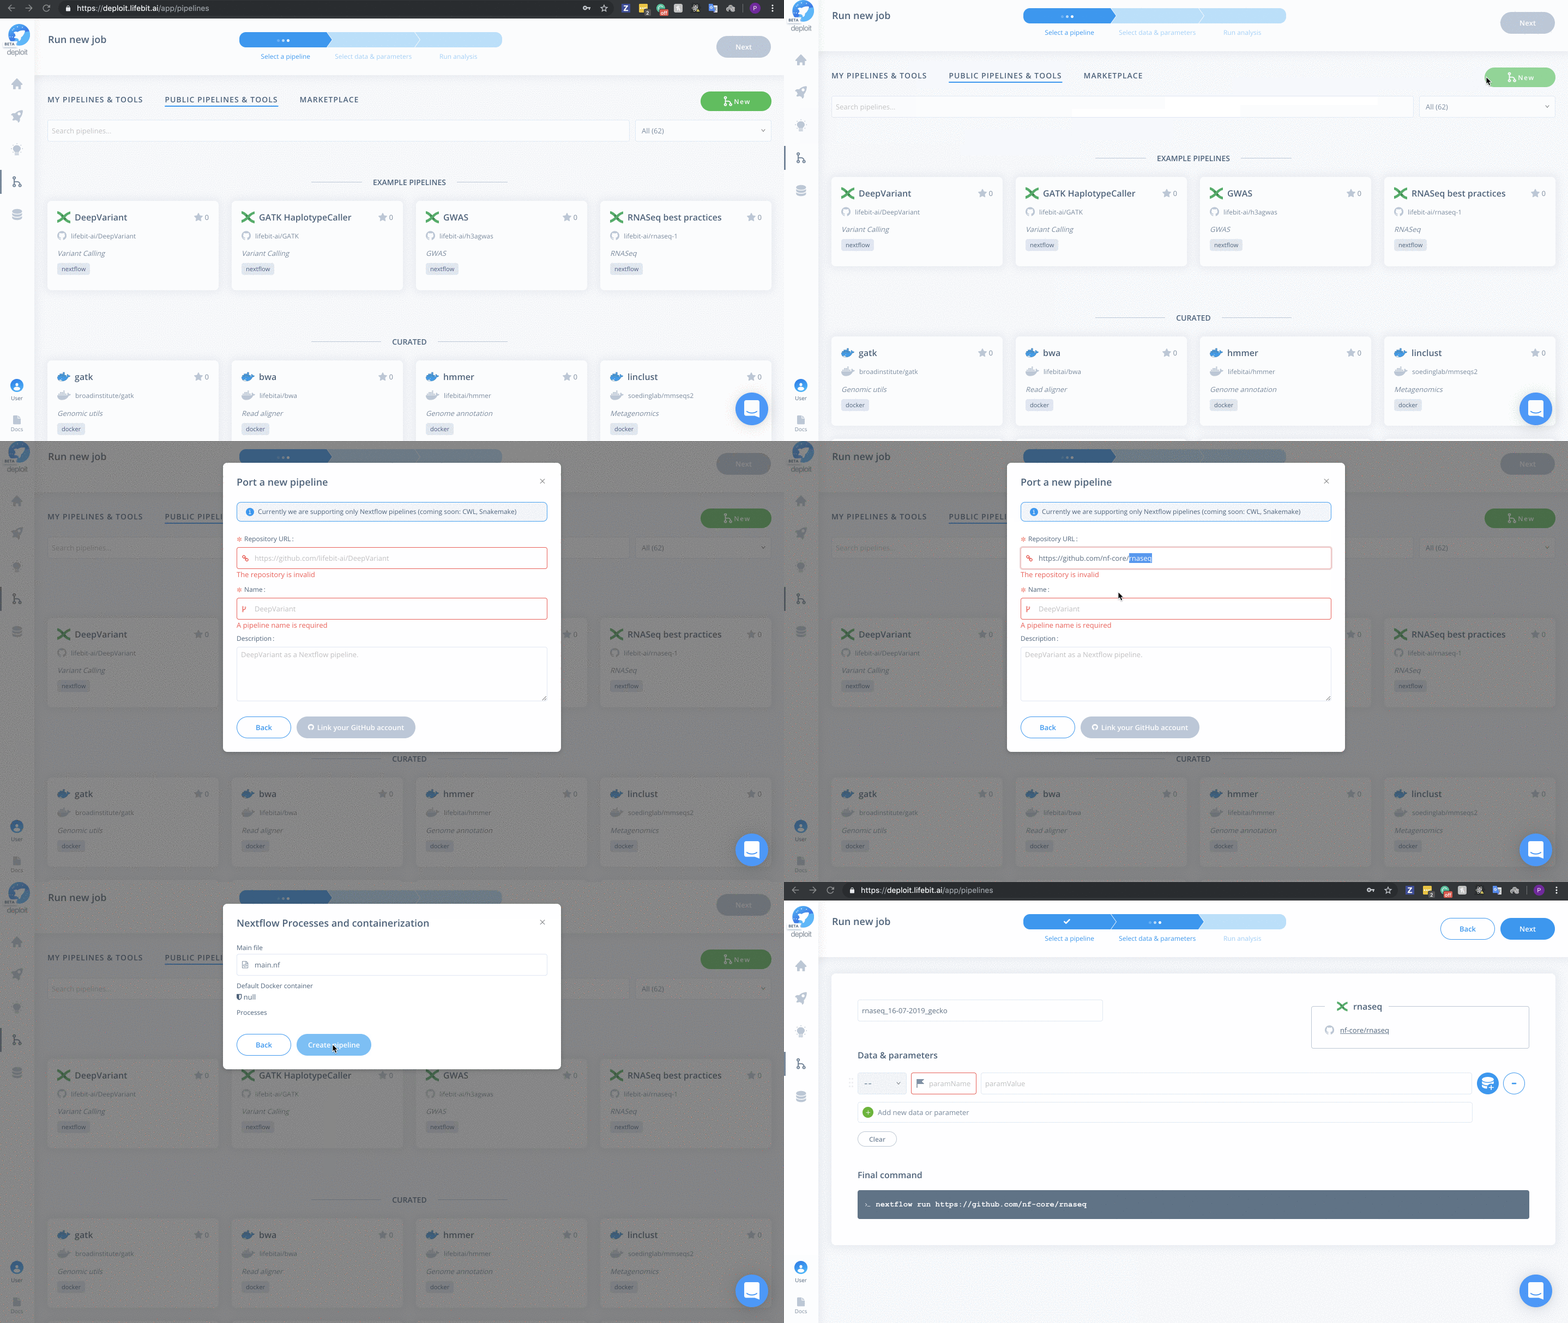
Once on the pipelines page, you are able to create a new pipeline. To do this follow the steps below:
- Click the green “New” button
- You can then “Select” the GitHub logo to import the RNA-seq pipeline which is coming from GitHub

- Paste the URL of the repository from GitHub: https://github.com/nf-core/rnaseq
- Name the pipeline, eg “rnaseq”
- Optionally: give the pipeline a description
- Finally, click “Next”

(Optional) Select a pipeline
This step is optional because at the end of the last step you will be taken to the page to select data & parameters for the newly imported pipeline. If this is the case, you don’t need to do anything for this step.
Your imported pipelines can be found on the pipelines page under the “MY PIPELINES & TOOLS” tab:


Selecting data & parameters
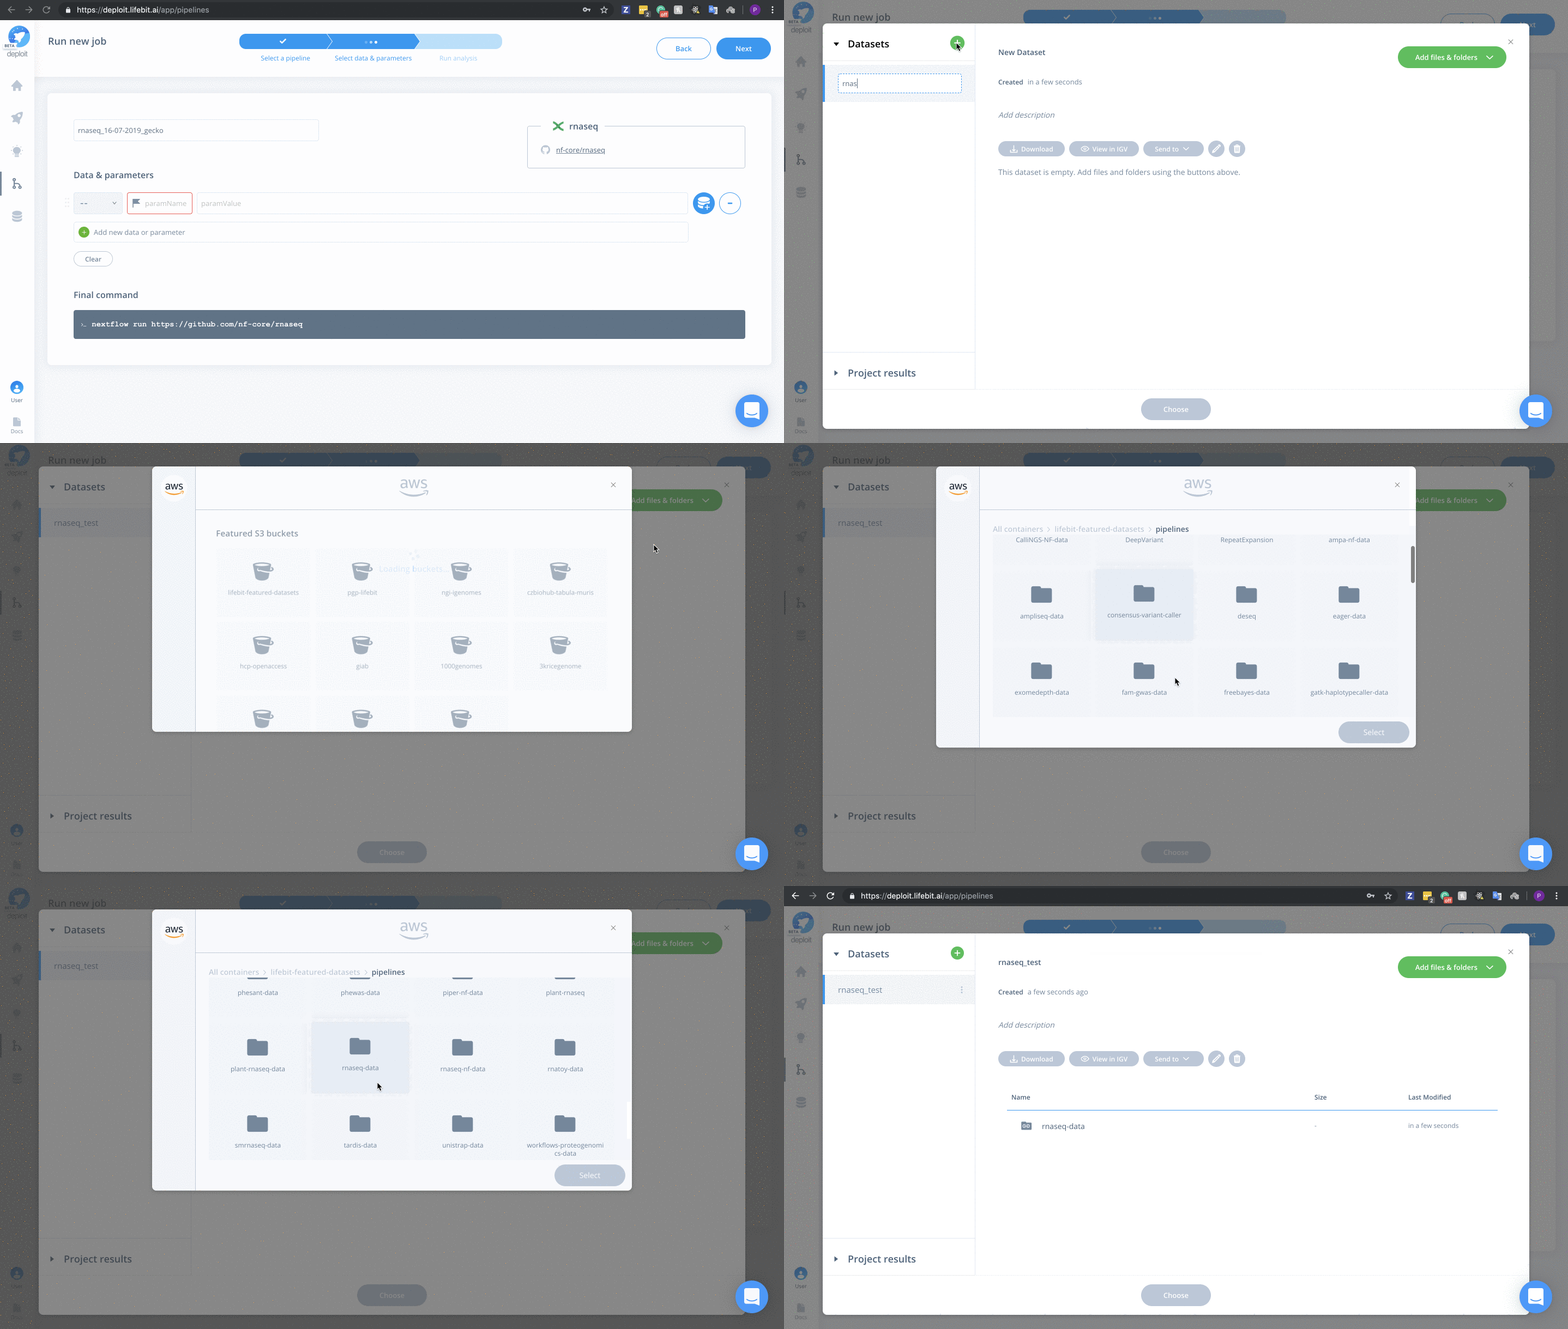
We have provided example data within the S3 bucket s3://lifebit-featured-datasets/pipelines/rnaseq-data. Alternatively, you can select your own input S3 bucket/data required you have the correct input files.
To select input data & parameters:
Import the dataset
- Click the blue add data button

- Click the green plus to add a new dataset

- Optional: enter a name for your new dataset, eg “rnaseq_test” & hit enter
- Click “Add files & folders” & “Import”

- Double click lifebit-featured S3 bucket & navigate to the folder “lifebit-featured-datasets/pipelines/rnaseq-data”

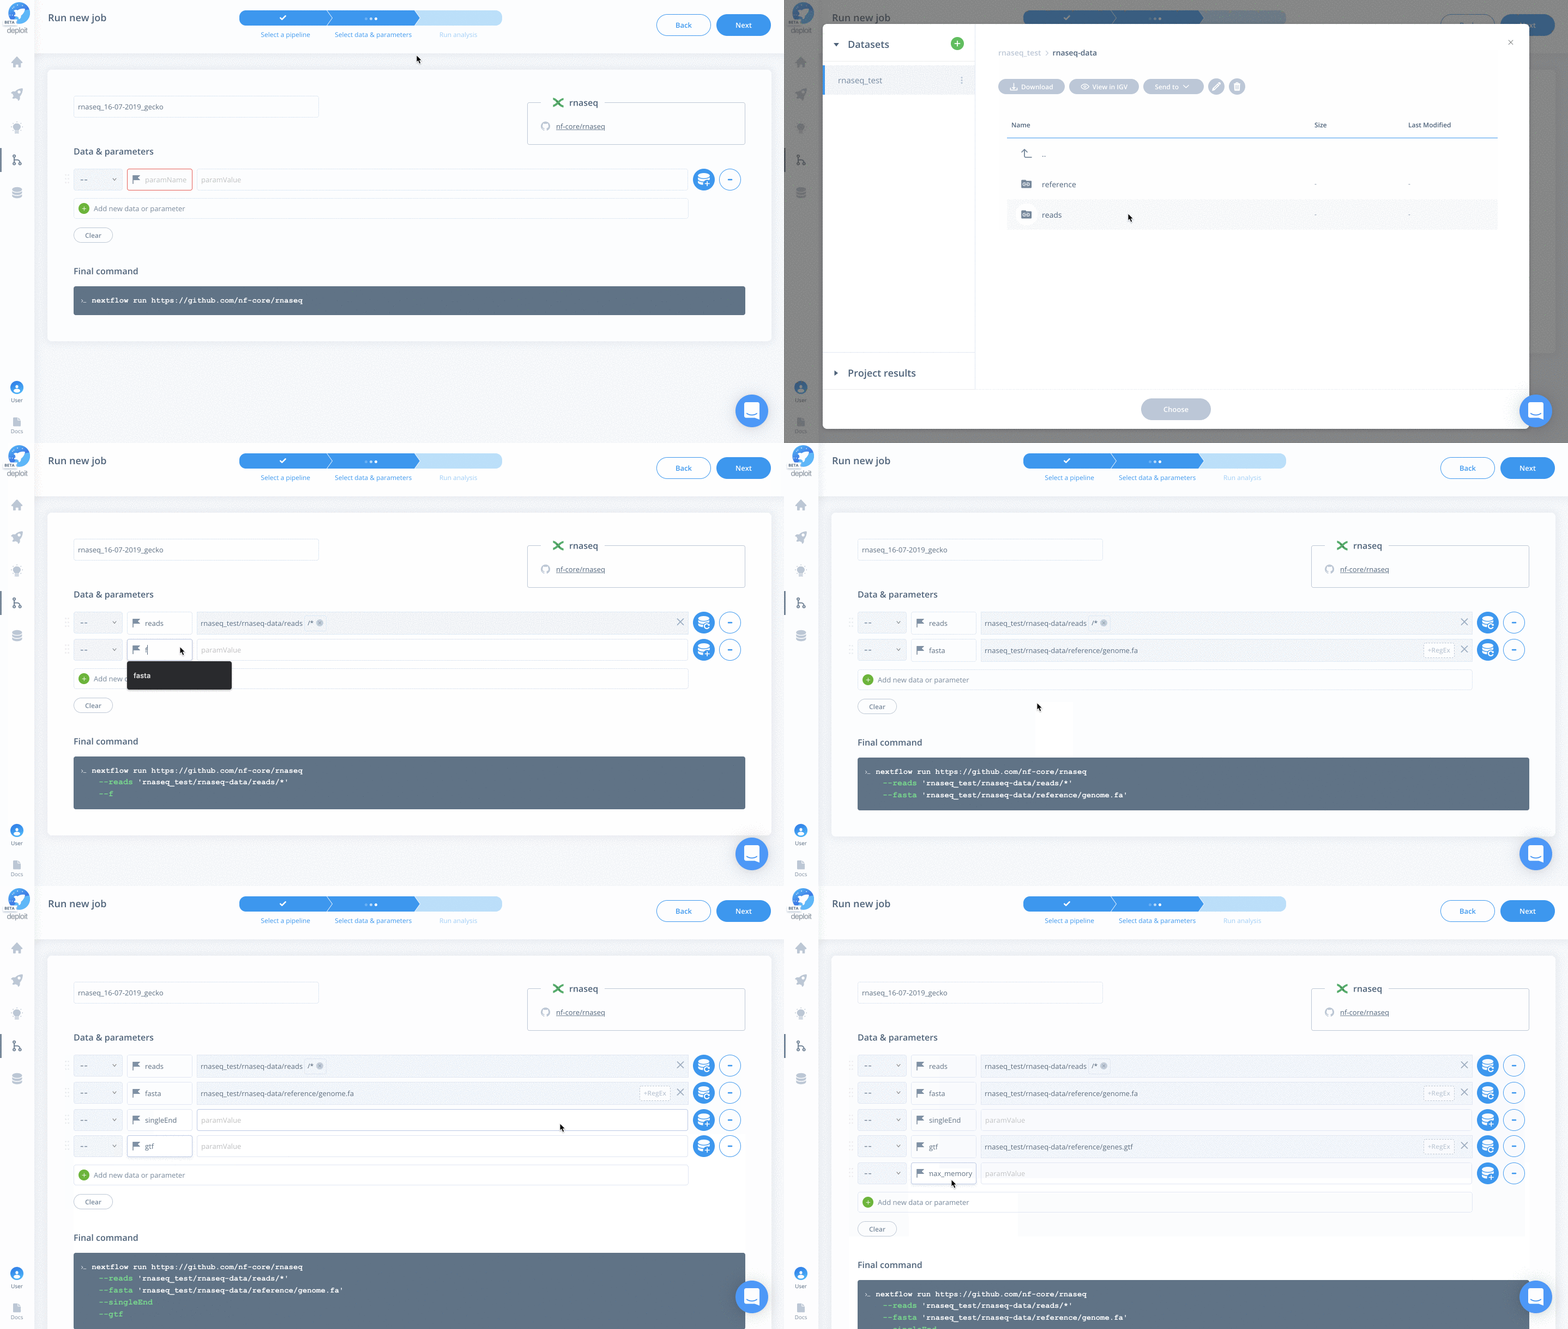
Add & set the following parameters/data:
For any of the nf-core pipelines, you can see a well-documented list of all available parameters. For the RNA-seq pipeline, we will add the following:
- reads – Select the folder “rnaseq_test/rnaseq-data/reads” & add the regex “*” to select all FastQ files within the folder
- singleEnd – To select single-end reads
- fasta – Select the file “rnaseq_test/rnaseq-data/reference/genome.fa”
- gtf -Select the file “rnaseq_test/rnaseq-data/reference/genes.gtf”
- max_memory -Type “60.GB” to prevent the pipeline from using too much memory
- Click “Next”

Running an analysis
You’re almost done! The last 3 steps follow and then you’ll you have successfully scheduled and deployed your first job on the CloudOS platform!
- Select a project
- This is to group analyses together
- For example, you can select the existing “Demo” project
- Select an instance
- This is to set the compute resources available for running the analysis
- For example, you can select the instance “m2.2xlarge”
- Finally, click “Run job”

Monitoring an analysis
After clicking ”Run Job”, the job will be initialising and will take ~5mins to initialise while the AWS instance is scheduled. Until then you can navigate to the jobs page dashboard to view all jobs (both completed & running). Once the job has finished initialising, you can click on it to view the Job Analysis page. Here, you can view the resource consumption, results & MultiQC HTML quality control report.

View an example completed job
This tutorial shows you how you can import and run the nfcore/rnaseq pipeline on CloudOS. We’re pleased to say that we have the released & stable nf-core pipelines already on the CloudOS platform with example data and parameters. This means that they are even easier to run!
Thanks for reading & hope you enjoyed the blog post. Now that you’ve learned how you can run any of the nf-core pipelines over CloudOS be sure to check out all of the nf-core pipelines so that you can go out and…
We would like to know what you think! Please fill out the following form or contact us at hello@lifebit.ai. We welcome your comments and suggestions!
This tutorial shows you how you can import and run nf-core RNA-seq in the cloud using the nfcore/rnaseq pipeline on CloudOS. We’re pleased to say that we have the released & stable nf-core pipelines already on the CloudOS platform with example data and parameters to help you run nf-core RNA-seq in the cloud easily!
Thanks for reading & hope you enjoyed the blog post. Now that you’ve learned how you can run nf-core RNA-seq in the cloud using any of the nf-core pipelines over CloudOS, be sure to check out all of the nf-core pipelines so that you can go out and run nf-core RNA-seq in the cloud to advance your research.

